Saturday, 10 March 2018

Setting Up Prerequisites for Oracle DB 11.2.0.4 Installation in Oracle Linux 7.2---Part I

Requirements

1.Recommended minimum RAM needed for Oracle is 2GB or more.
2.Swap must be enabled double the size of RAM.
3.Disk space must be more than 8GB, its depends on edition which are 
   we going to choose for installing.
4./tmp directory must have free space more than 1GB for error free installation.
5.Supported Linux operating systems are RHEL, Centos, Oracle.
6.Both x86_64 and i686 packages are required for installation.
7.Screen resolution must be more than 1024×768 resolution.

Below is my Testing Environment

IP Address       :           192.168.65.130
Host-name      :           oidrep.localdomain

Note:-use root login for all below installation instructions


1.)If you’ve not set your system hostname, edit the system hosts file
   ‘/etc/hosts‘ and enter your hostname entry along with IP address as shown below.
   
2. Now change the SELinux mode to permissive and restart the system to
       make Permanent changes for selinux.


Installing Packages and changing Kernel Values

1.Login as root and install following below required dependencies.

yum install binutils.x86_64
yum install compat-libcap1.x86_64 
yum install compat-libstdc++-33.x86_64 
yum install compat-libstdc++-33.i686 
yum install compat-gcc-44 
yum install compat-gcc-44-c++ 
yum install gcc.x86_64 
yum install gcc-c++.x86_64 
yum install glibc.i686
yum install glibc.x86_64 
yum install glibc-devel.i686 
yum install glibc-devel.x86_64  
yum install ksh.x86_64
yum install libgcc.i686
yum install libgcc.x86_64
yum install libstdc++.i686
yum install libstdc++.x86_64
yum install libstdc++-devel.i686 
yum install libstdc++-devel.x86_64 
yum install libaio.i686
yum install libaio.x86_64 
yum install libaio-devel.i686
yum install libaio-devel.x86_64
yum install libXext.i686 
yum install libXext.x86_64 
yum install libXtst.i686 
yum install libXtst.x86_64
yum install libX11.x86_64 
yum install libX11.i686 
yum install libXau.x86_64
yum install libXau.i686
yum install libxcb.i686 
yum install libxcb.x86_64
yum install libXi.i686 
yum install libXi.x86_64 
yum install make.x86_64 
yum install unixODBC 
yum install unixODBC-devel 
yum install sysstat.x86_64

2.After installing all the above needed packages, now it’s time to do some 
   changes at kernel level parameters in ‘/etc/sysct.conf file.

fs.suid_dumpable = 1
fs.aio-max-nr = 1048576
fs.file-max = 6815744
kernel.shmall = 2097152
kernel.shmmax = 536870912
kernel.shmmni = 4096
# semaphores: semmsl, semmns, semopm, semmni
kernel.sem = 250 32000 100 128
net.ipv4.ip_local_port_range = 9000 65500
net.core.rmem_default=262144
net.core.rmem_max=4194304
net.core.wmem_default=262144
net.core.wmem_max=1048586
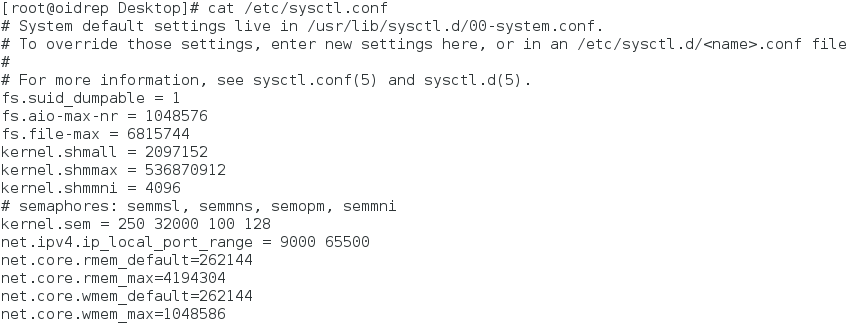
Save and quit using wq!
3.Once you’ve added above values, now issue following command to take
    new changes into effect.
   use command sysctl -p
4.Restart the machine and following below for installing Oracle database.
5.Create the new groups Oracle inventory, OSDBA and OSOPER
  for Oracle installation.
   groupadd -g 54321 oracle
   groupadd -g 54322 dba
   groupadd -g 54323 oper
   groupadd -g 54324 oinstall

6. Create the new user oracle and add the user to already created groups.
    useradd -u 54324 -g oracle -G dba,oper oracle
    usermod -a -G oinstall oracle
    passwd XXXXX
7. If your system is enabled with firewall, you need to disable or
    configure it according to your needs.
    To disable it, run the following commands.
    service firewalld status
    service firewalld stop
    service firewalld status
8.Create the following directory for installing Oracle and change the
   ownership and grand permission to the newly created directory
    using recursive.
   mkdir -p /u01/app/oracle/product/12.1.0/db_1
   chown -R oracle:oinstall /u01
   chmod -R 775 /u01
   ls -l /u01
9.We need to add the environmental variable for oracle user.
   Open and edit the profile file of oracle user and append the 
   oracle environment entries.
   Here we don’t need to use sudo command, 
   as we are already logged in as root user.

vi /home/oracle/.bash_profile

export TMP=/tmp
export TMPDIR=$TMP
export ORACLE_HOSTNAME=oidrep.localdomain
export ORACLE_UNQNAME=orcl
export ORACLE_BASE=/u01/app/oracle
export ORACLE_HOME=$ORACLE_BASE/product/12.1.0/db_1
export ORACLE_SID=orcl
export PATH=/usr/sbin:$PATH
export PATH=$ORACLE_HOME/bin:$PATH
export LD_LIBRARY_PATH=$ORACLE_HOME/lib:/lib:/usr/lib
export CLASSPATH=$ORACLE_HOME/jlib:$ORACLE_HOME/rdbms/jlib
Save and exit the vi editor using wq!
10.Again, this step is not required, if you are already using root account, 
      just switch to oracle user for further instructions.
11.Here we need to check for the resource limits for oracle installing user.
     Here our Oracle installer user is oracle.
     So we must be logged in as oracle user, while doing resource check.
     Check for the soft and hard limits for file descriptor settings 
      before installation.
    ulimit -Sn
    ulimit -Hn
    ulimit -Su
    ulimit -Hu
    ulimit -Ss
    ulimit -Hs

11.You may get different values in the above command.
     So, you need to manually assign the values for limits 
     in configuration file as shown below.

     vi /etc/security/limits.conf

    oracle              soft    nproc   16384
    oracle              hard    nproc   16384
    oracle              soft    nofile  4096
    oracle              hard    nofile  65536
    oracle              soft    stack   10240
12.Next, edit the below file to set the limit for all users.
     # Change this
       *          soft    nproc    1024
     # To this
     * - nproc 16384 
Save and exit the vi editor using wq!


Wednesday, 7 March 2018

Issue Audit Messages Task Job Throws Warning IAM-0050001 java.lang.Exception: Audit handler failed

Issue Audit Messages Task Job Throws Warning IAM-0050001 java.lang.Exception: Audit handler failed
Error:-

oracle.iam.platform.async.TaskExecutionException: java.lang.Exception: Audit handler failed at com.thortech.xl.audit.engine.jms.XLAuditMessage.execute(XLAuditMessage.java:59) at
oracle.iam.platform.async.impl.TaskExecutor$1.processWithoutResult(TaskExecutor.java:125)        at oracle.iam.platform.tx.OIMTransactionCallbackWithoutResult.process(OIMTransactionCallbackWithoutResult.java:9)at oracle.iam.platform.tx.OIMTransactionCallback.doInTransaction(OIMTransactionCallback.java:13)at oracle.iam.platform.tx.OIMTransactionCallback.doInTransaction(OIMTransactionCallback.java:6)       at org.springframework.transaction.support.TransactionTemplate.execute(TransactionTemplate.java:128)at oracle.iam.platform.tx.OIMTransactionManager.execute(OIMTransactionManager.java:22) at oracle.iam.platform.async.impl.TaskExecutor.executeManagedTask(TaskExecutor.java:12)at oracle.iam.platform.async.impl.TaskExecutor.execute(TaskExecutor.java:67) at oracle.iam.platform.async.messaging.MessageReceiver.onMessage(MessageReceiver.java:68)at sun.reflect.GeneratedMethodAccessor1059.invoke(Unknown Source) at sun.reflect.DelegatingMethodAccessorImpl.invoke(DelegatingMethodAccessorImpl.java:43)  at java.lang.reflect.Method.invoke(Method.java:606)at com.bea.core.repackaged.springframework.aop.support.AopUtils.invokeJoinpointUsingReflection(AopUtils.java:310)at com.bea.core.repackaged.springframework.aop.framework.ReflectiveMethodInvocation.invokeJoinpoint(ReflectiveMethodInvocation.java:182)at com.bea.core.repackaged.springframework.aop.framework.ReflectiveMethodInvocation.proceed(ReflectiveMethodInvocation.java:149)at com.bea.core.repackaged.springframework.aop.interceptor.ExposeInvocationInterceptor.invoke(ExposeInvocationInterceptor.java:89) at com.bea.core.repackaged.springframework.aop.framework.ReflectiveMethodInvocation.proceed(ReflectiveMethodInvocation.java:171)at com.bea.core.repackaged.springframework.aop.support.DelegatingIntroductionInterceptor.doProceed(DelegatingIntroductionInterceptor.java:131)at com.bea.core.repackaged.springframework.aop.support.DelegatingIntroductionInterceptor.invoke(DelegatingIntroductionInterceptor.java:119)at com.bea.core.repackaged.springframework.aop.framework.ReflectiveMethodInvocation.proceed(ReflectiveMethodInvocation.java:171)at com.bea.core.repackaged.springframework.aop.framework.JdkDynamicAopProxy.invoke(JdkDynamicAopProxy.java:204)at com.sun.proxy.$Proxy446.onMessage(Unknown Source)at weblogic.ejb.container.internal.MDListener.execute(MDListener.java:583)  at weblogic.ejb.container.internal.MDListener.transactionalOnMessage(MDListener.java:486) at weblogic.ejb.container.internal.MDListener.onMessage(MDListener.java:388)at weblogic.jms.client.JMSSession.onMessage(JMSSession.java:4817)at weblogic.jms.client.JMSSession.execute(JMSSession.java:4491)at weblogic.jms.client.JMSSession.executeMessage(JMSSession.java:3945)at weblogic.jms.client.JMSSession.access$000(JMSSession.java:115)at weblogic.jms.client.JMSSession$UseForRunnable.run(JMSSession.java:5337)at weblogic.work.SelfTuningWorkManagerImpl$WorkAdapterImpl.run(SelfTuningWorkManagerImpl.java:550)at weblogic.work.ExecuteThread.execute(ExecuteThread.java:263)at weblogic.work.ExecuteThread.run(ExecuteThread.java:221)
Caused by: java.lang.Exception: Audit handler failed
        ... 34 more

Solution:-

Issue audit messages scheduled task should do the "cleanup" job.
Its recommendation is to schedule "Issue Audit Messages Task" to run every five minutes, with Max Records set to 200. Again, this can be tuned per ones requirements.

1. Logon to OIM sysadmin console
2. Click on Schedulers
3. Search for Issue Audit Messages Task scheduler
4. In Job Information-->Retries change value to 5.
5. Click on Apply
6. Bring down all managed servers node by node
7. Take backup and delete tmp,cache and data folder
8. Restart servers error should go away


Monday, 19 February 2018

MisfireHandler: Error handling misfires: Unexpected runtime exception: null org.quartz.JobPersistenceException: Unexpected runtime exception: null

          MisfireHandler: Error handling misfires: Unexpected runtime exception: null
           org.quartz.JobPersistenceException: Unexpected runtime exception: null

Version:-11.1.2.3.0

Error:-

<Feb 19, 2018 4:28:47 PM IST> <Error> <org.quartz.impl.jdbcjobstore.JobStoreCMT> <BEA-000000> <MisfireHandler: Error handling misfires: Unexpected runtime exception: null
org.quartz.JobPersistenceException: Unexpected runtime exception: null [See nested exception: java.lang.NullPointerException]
        at org.quartz.impl.jdbcjobstore.JobStoreSupport.doRecoverMisfires(JobStoreSupport.java:3042)
        at org.quartz.impl.jdbcjobstore.JobStoreSupport$MisfireHandler.manage(JobStoreSupport.java:3789)
        at org.quartz.impl.jdbcjobstore.JobStoreSupport$MisfireHandler.run(JobStoreSupport.java:3809)
Caused By: java.lang.NullPointerException
        at org.quartz.SimpleTrigger.computeNumTimesFiredBetween(SimpleTrigger.java:800)
        at org.quartz.SimpleTrigger.updateAfterMisfire(SimpleTrigger.java:514)
        at org.quartz.impl.jdbcjobstore.JobStoreSupport.doUpdateOfMisfiredTrigger(JobStoreSupport.java:944)
        at org.quartz.impl.jdbcjobstore.JobStoreSupport.recoverMisfiredJobs(JobStoreSupport.java:898)
        at org.quartz.impl.jdbcjobstore.JobStoreSupport.doRecoverMisfires(JobStoreSupport.java:3029)
        at org.quartz.impl.jdbcjobstore.JobStoreSupport$MisfireHandler.manage(JobStoreSupport.java:3789)

        at org.quartz.impl.jdbcjobstore.JobStoreSupport$MisfireHandler.run(JobStoreSupport.java:3809)


CAUSE

Time value.

To Resolve above error from logs:- 

If your using a GTC connector, you need to update the newly created task's "Start date", System Management > Scheduler > *GTCTASK*,
1.      Logon to sysadmin console>schedulers>search for *GTCTASK *>
2.      Change start date time in all GTCTASKS and click on apply
3.      Take backup of tmp, cache and data folder and remove tmp, cache and data folders from all managed server location
4.      Restart Severs
Note: - The default date is 31 Dec 1969, upon being updated with the current date,
                or a date in the future, the exception is gone from the logs.
              (The problem here is that dates prior to UTC midnight 1 Jan 1970 are 
                expressed as negative numbers, and having a negative number as a 
                date causes this exception. Verify that the.Scheduled start times of 
                ALL OIM job instances are set to  sometime after Jan 1, 1970 UTC? Just set
               the start date to post 2000 and after a restart the error should go away.


java.lang.Exception:at org.jgroups.protocols.UDP._send(UDP.java:212) Error in OIM and SOA server logs

java.lang.Exception:at org.jgroups.protocols.UDP._send(UDP.java:212)
Error in OIM and SOA server logs

OIM Version:-11.1.2.3.0

Error:-

<Feb 19, 2018 3:04:10 PM IST> <Error> <org.jgroups.protocols.UDP> <BEA-000000> <failed sending message to null (58 bytes)
java.lang.Exception: dest=/224.255.1.75:45566 (61 bytes)
        at org.jgroups.protocols.UDP._send(UDP.java:212)
        at org.jgroups.protocols.UDP.sendToAllMembers(UDP.java:167)
        at org.jgroups.protocols.TP.doSend(TP.java:1102)
        at org.jgroups.protocols.TP.send(TP.java:1088)
        at org.jgroups.protocols.TP.down(TP.java:907)
        at org.jgroups.protocols.PING.sendMcastDiscoveryRequest(PING.java:276)
        at org.jgroups.protocols.PING.sendGetMembersRequest(PING.java:256)
        at org.jgroups.protocols.Discovery$PingSenderTask$1.run(Discovery.java:396)
        at java.util.concurrent.Executors$RunnableAdapter.call(Executors.java:471)
        at java.util.concurrent.FutureTask.runAndReset(FutureTask.java:304)
        at java.util.concurrent.ScheduledThreadPoolExecutor$ScheduledFutureTask.access$301(ScheduledThreadPoolExecutor.java:178)
        at java.util.concurrent.ScheduledThreadPoolExecutor$ScheduledFutureTask.run(ScheduledThreadPoolExecutor.java:293)
        at java.util.concurrent.ThreadPoolExecutor.runWorker(ThreadPoolExecutor.java:1145)
        at java.util.concurrent.ThreadPoolExecutor$Worker.run(ThreadPoolExecutor.java:615)
        at java.lang.Thread.run(Thread.java:745)
Caused By: java.io.IOException: Invalid argument
        at java.net.PlainDatagramSocketImpl.send(Native Method)
        at java.net.DatagramSocket.send(DatagramSocket.java:698)
        at org.jgroups.protocols.UDP._send(UDP.java:204)
        at org.jgroups.protocols.UDP.sendToAllMembers(UDP.java:167)
        at org.jgroups.protocols.TP.doSend(TP.java:1102)
        at org.jgroups.protocols.TP.send(TP.java:1088)
        at org.jgroups.protocols.TP.down(TP.java:907)
        at org.jgroups.protocols.PING.sendMcastDiscoveryRequest(PING.java:276)
        at org.jgroups.protocols.PING.sendGetMembersRequest(PING.java:256)
        at org.jgroups.protocols.Discovery$PingSenderTask$1.run(Discovery.java:396)
        at java.util.concurrent.Executors$RunnableAdapter.call(Executors.java:471)
        at java.util.concurrent.FutureTask.runAndReset(FutureTask.java:304)
        at java.util.concurrent.ScheduledThreadPoolExecutor$ScheduledFutureTask.access$301(ScheduledThreadPoolExecutor.java:178)
        at java.util.concurrent.ScheduledThreadPoolExecutor$ScheduledFutureTask.run(ScheduledThreadPoolExecutor.java:293)
        at java.util.concurrent.ThreadPoolExecutor.runWorker(ThreadPoolExecutor.java:1145)
        at java.util.concurrent.ThreadPoolExecutor$Worker.run(ThreadPoolExecutor.java:615)
        at java.lang.Thread.run(Thread.java:745)

>

To Resolve above Error:-


Add this property to the startup tab of the server in weblogic console if you have setup the oim server and soa server to start using the weblogic console:

1. Log in to the WebLogic Console.
2. Navigate to Environment -> Servers.
3. Click Lock and Edit.
4. Click on the OIM or SOA Managed server.
5. Click on the Server Start subtab
6. Add the following to the Arguments field:
  -Djava.net.preferIPv4Stack=true
  Note:-Add following argument field in all managed servers if it is cluster
7. Click Save.
8. Click Activate Changes.
9. Restart the managed WebLogic server

or

If you trying to start Managed servers using script or from back-end location
add following argument :-Djava.net.preferIPv4Stack=true in setDomainEnv.sh file

Note: Take backup of tmp, cache and data folders present 
           servers location of all managed  servers and restart servers.

If you’re having Managed servers in cluster nodes add following
 Argument: - -Djava.net.preferIPv4Stack=true in setDomainEnv.sh file
Present in all cluster nodes.

Take backup of tmp, cache and data folders present servers’ location of
Managed server and restart servers

Saturday, 10 February 2018

Loading Bulk Organisations Using Bulk Load Utility In OIM 12c (12.2.1.3.0)

          Loading Bulk Organisations Using  Bulk Load Utility In OIM 12c (12.2.1.3.0)

The Bulk Load utility is aimed at automating the process of loading a large amount of data into Oracle Identity Manager. It helps reduce the downtime involved in loading data. You can use this utility after you install Oracle Identity Manager or at any time during the production lifetime of Oracle Identity Manager. The Bulk Load utility can load users, accounts, roles, role hierarchy, role membership, role category data, and organizations

Modes of Running the Utility

The Bulk Load utility can be run in one of the following modes:
Offline mode: This is the traditional or existing mode.
                         To run the utility in offline mode, 
                         Oracle Identity Manager must be down.
Online mode: In online mode, there is no need to 
                        shut down Oracle Identity Manager.
                        online mode only implies that the utility can be run when
                        Oracle Identity Manager is  up and running.
                        It is still a command-line utility and no other interface
                        is available for online mode.

By default, Bulk Load utility runs in online mode.

To choose between the online or offline mode, consider the following factors:

At times, service availability is more important for business reasons.
Choose default online mode in this case.

If volume of new entities loaded is not huge, cost of service restart and index rebuild after offline bulkload is higher than slight performance degradation in online mode.
Choose default online mode in this case.

When load volume is high and existing system data is less in comparison, offline bulk load might have some advantages

Prerequisites to run the bulkload utility in OIM12C

Temporary table Space
While running the script, the script will create few temporary tables.

OIM_BLKLD_TMP_SUFFIX :  The script will first loads data from the CSV file into this table

OIM_BLKLD_EX_SUFFIX  : This table is used to hold data records that fail (are not loaded into Oracle Identity Manager) during a bulk load operation.

OIM_BLKLD_LOG : The utility inserts progress and error messages in the OIM_BLKLD_LOG table.

You can use either default OIM table space or separate table space to store these temporary tables. It is recommended to create and use a separate tablespace to store these temporary tables. If you want to use the OIM default table space, add space to this data file. You can add data file to oim database table space by running the oim_blkld_setup.sql script as explained below,

Login to OIM database as sysdba

Execute the oim_blkld_setup.sql

Enter the OIM default table space name

Name and full path of the data file to be added in OIM Database

Enter the OIM database username
Below is the location of oimbulkload in my case:-
1.)    /u03/idm/server/db/oim/oracle/Utilities/oimbulkload
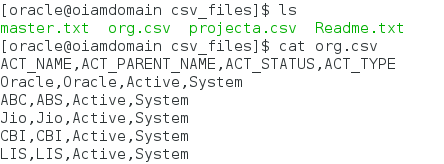
2.) In /u03/idm/server/db/oim/oracle/Utilities/oimbulkload/csv_files
     you should be able to see master.txt file and Readme.txt files
     org.csv file is file which we have created for loading organisation data
3.) In my case we have created the csv file with org.csv and placed file in
    the csv_files directory with the user data to be loaded.
4.) In master.txt file enter the name of csv file that should be used for
     Loading Organisations data and save in our case its org.csv
5.) Stop OIM server before running Bulk Load Utility
6.) Execute oim_blkld.sh script.
7.) Select the operation to perform bulkload utility
     Here in my case we are loading organisation data 
     so selected option as 7,select option here as per your requirement 
     and press enter
8.) Enter Database Details here as per location of db installed
     In my case location is
     /u01/app/oracle/product/12.1.0/db_1 as ORACLE_HOME
     Press Enter
9.) Once enter here it shows whether entered ORACLE_HOME is valid or not
10.) Here enter oim database connect string in following format
       //HostIPAddress:Port/ServiceName
       //HosIPAddress:1521/orcl  and click enter
11.) Enter Oracle Identity Manager (OIM) database user name
       In my case it is PROD_OIM provide db user name as per your requirement
12.) Once entered it will as to enter 
        OIM DB user password twice.Provide password twice and click on enter

13.) Enter password for OIM Db user again and click enter
14.) Select the input for organization load as per your requirement.
       In my case we are loading organisations via 
       CSV File so chosen option as 2 and enter
15.) Enter the name of the master file containing names of all 
       csv files to be loaded.Enter name as master.txt and enter

16.) Enter the Name of table space to be used for creating custom objects,
        by utility [PROD_OIM],Press enter by default PROD_OIM will be selected.
17.) Enter the date format for data load: MM-DD-YYYY
18.) Enter batch size for processing defined size as per your
      Requirement and press enter
19.) Do you wish to insert log messages if yes provide 
       value as Y and Enter and if no provide value as N and enter

Note:-Fix the issues with failed Organizations and execute 
           the utility again to load the failed  Organizations

22.) Temporary Tables Created
       OIM_BLKLD_TMP_{FILE_SUFFIX} : Loads data from csv into this table
       OIM_BLKLD_EX_{FILE_SUFFIX}: Stores data records that fail during
                                                                                  bulk load
       OIM_BLKLD_LOG: Logs errors and monitor progress

23.) Lets login to Identity Console and check the newly created Organizations.


Sunday, 4 February 2018

Using the Bulk Load Utility in OIM 12c (12.2.1.3.0)

                            Using the Bulk Load Utility in OIM 12c (12.2.1.3.0)

The Bulk Load utility is aimed at automating the process of loading a large amount of data into Oracle Identity Manager. It helps reduce the downtime involved in loading data. You can use this utility after you install Oracle Identity Manager or at any time during the production lifetime of Oracle Identity Manager. The Bulk Load utility can load users, accounts, roles, role hierarchy, role membership, role category data, and organizations


Modes of Running the Utility

The Bulk Load utility can be run in one of the following modes:
Offline mode: This is the traditional or existing mode.
                         To run the utility in offline mode, Oracle Identity Manager must be down.
Online mode: In online mode, there is no need to shut down Oracle Identity Manager.
                         online mode only implies that the utility can be run when 
                         Oracle Identity Manager is  up and running. It is still a command-line
                         utility and no other interface is available for online mode.

By default, Bulk Load utility runs in online mode.

To choose between the online or offline mode, consider the following factors:

At times, service availability is more important for business reasons.
Choose default online mode in this case.

If volume of new entities loaded is not huge, cost of service restart and index rebuild after offline bulkload is higher than slight performance degradation in online mode. 
Choose default online mode in this case.

When load volume is high and existing system data is less in comparison, offline bulk load might have some advantages

Prerequisites to run the bulkload utility in OIM12C

Temporary table Space

While running the script, the script will create few temporary tables.

OIM_BLKLD_TMP_SUFFIX :  The script will first loads data from the CSV file into this table

OIM_BLKLD_EX_SUFFIX  : This table is used to hold data records that fail (are not loaded into Oracle Identity Manager) during a bulk load operation.

OIM_BLKLD_LOG : The utility inserts progress and error messages in the OIM_BLKLD_LOG table.
You can use either default OIM table space or separate table space to store these temporary tables. It is recommended to create and use a separate tablespace to store these temporary tables. If you want to use the OIM default table space, add space to this data file. You can add data file to oim database table space by running the oim_blkld_setup.sql script as explained below,

Login to OIM database as sysdba

Execute the oim_blkld_setup.sql

Enter the OIM default table space name

Name and full path of the data file to be added in OIM Database

Enter the OIM database username

Create OIM user to copy password

Login to OIM server and create a new user.

This password for this user will be copied as the default password for all the users created by oimbulkload utility.


Below is the location of oimbulkload in my case:-
1.)/u03/idm/server/db/oim/oracle/Utilities/oimbulkload
2.)In /u03/idm/server/db/oim/oracle/Utilities/oimbulkload/csv_files
    you should be able to see master.txt file and Readme.txt files
    projecta.csv file is file which we have created for loading user data
3.) In my case we have created the csv file with projecta.csv and placed file in 
     the csv_files directory with the user data to be loaded
4.)In master.txt file enter the name of csv file that should be used for
    loading user data and save in our case its projecta.csv
5.) Stop OIM server before running Bulk Load Utility
6.) Execute oim_blkld.sh script.
7.)Select the operation to perform bulkload utility
     Here in my case we re loading user data so selected option as 1,
     select option here as per your requirement and press enter
8.)Enter Database Details here as per location of db installaed
    In my case location is:-/u01/app/oracle/product/12.1.0/db_1 as ORACLE_HOME
    Press Enter     
9.)Once enter here it shows whether entered ORACLE_HOME is valid or not
10.)Here enter oim database connect string in following format
    //HostIPAddress:Port/ServiceName
    //HosIPAddress:1521/orcl  and click enter
11.)Enter Oracle Identity Manager (OIM) database user name
       In my case it is PROD_OIM provide db user name as per your requirement
12.)Once entered it will as to enter OIM DB user password twice
      Provide password twice and click on enter
13.)Enter password for OIM Db user again and click enter
14.)Select the input for user load as per your requirement.
      In my case we are loading users via CSV File so choosen option as 2 and enter
15.)Enter the name of the master file contining names of all csv files to be loaded
Enter name as master.txt and enter
16.)Enter the Name of tablespace to be used for creating custom objects,
      by utility [PROD_OIM],Press enter by default PROD_OIM will be selected.
17.)Enter the date format for data load:
      MM-DD-YYYY
18.)Enter batch size for processing defined size as per your
      requirement and press enter
19.)Do you wish to insert log msgs if yes provide value as Y and
      Enter and if no provide value as N and enter
20.)Enter User ID (USR_LOGIN),of the user created from web console
      provide value as xelsysadm and click enter
21.)Enter User ID (USR_LOGIN),of the user created from web console
      provide value as xelsysadm and click enter
Note:-Fix the issues with failed users and execute the utility again to load the failed users 
22.)Temporary Tables Created
       OIM_BLKLD_TMP_{FILE_SUFFIX} : Loads data from csv into this table
       OIM_BLKLD_EX_{FILE_SUFFIX}: Stores data records that fail during bulk load
       OIM_BLKLD_LOG: Logs errors and monitor progress

23.) Lets login to Identity Console and check the newly created users.