Tuesday 18 December 2018

Installing Apache webgate using Silent Install fails with "[ERROR] Data Insufficient to Start Install"


Issue: - OAM11gR2PS3

Error: -[ERROR] Data Insufficient to start Install.
             [ERROR] One and Only One of the following variables must be present
             Variable Name:SKIP_SOFTWARE_UPDATES Expected Value:true
             Variable Name:SPECIFY_DOWNLOAD_LOCATION Expected Value:true
             [ERROR] One and Only One of the following variables must be present
             Variable Name:INSTALL AND CONFIGURE LATER TYPE Expected Value:true
             Variable Name:INSTALL AND CONFIGURE TYPE Expected Value:true
             .Aborting Install
             Calling OUI Exit Operations 

Solution: -Add the below missing parameters in the response file.

                  SKIP_SOFTWARE_UPDATES=true
                  INSTALL AND CONFIGURE LATER TYPE=true
                
Now run the silent upgrade using. /runInstaller -jreLoc jreLocation -silent -response /u01/apache.rsp


Thanks,
Aditya.


Thursday 22 November 2018

Error:- ORA-28365: wallet is not open


Issue: - (OIM 11gR2PS3) Error faced while running queries in OIM
Error: - ORA-28365: wallet is not open
              28365. 0000 -  "wallet is not open"
              *Cause:    The security module wallet has not been opened.
              *Action:   Open the wallet.


Solution:-
                   1.) Connect sqlplus / as sysdba
                   2.) ALTER SYSTEM SET ENCRYPTION WALLET OPEN IDENTIFIED BY "password";
                   3.) Exit


Thanks,
Aditya.

Saturday 27 October 2018

RCU-6080:Global prerequisite check failed – The selected Oracle database is a multitenant container database (CDB).

Issue:-Error faced while installing 12C RCU
Error:-RCU-6080:Global prerequisite check failed – Check requirement for specified database

          The selected Oracle database is a multitenant container database (CDB). 

          Connecting to a multitenant container database (CDB) is not supported. 

          Instead, connect to a valid pluggble database (PDB)

Solution 1:-
1.) Check where are your PDB installed(below my example):

SQL> select name from v$services;
NAME
pdborcl

weblogicXDB

weblogic

SYS$BACKGROUND

SYS$USERS


2) Alter your database:

 SQL> alter pluggable database all open;
 3) Insert the correct service name. On my case, is pdborcl:
      Try to re run RCU

Or

Solution 2:-


Note:- Make sure you are entering correct SID.
when i installed oracle database 12c i left global database name as default (orcl) and during  RCU run, i was entering global database name at the place of SID information.

Then i re-installed database and changed my global database name same as SID and re-run RCU,it was successful.

if u see above error make sure you are entering correct database information when running RCU


Thanks,
Aditya.

Friday 12 October 2018

‘Opatch’ is not recognized as an internal or external command

                 ‘Opatch’ is not recognized as an internal or external command

Environment:-Windows Server 2012R2 IIS application

Error:- ‘Opatch’ is not recognized as an internal or external command while installing
               patch for IIS webagte 11.1.2.3

Solution:-

My correct path is “C:\oracle\product\11.1.1\as_1” but i used wrong path in above command prompt “C:\oracle\product\11.1.1\as_1”. So, i got the error like ‘optach’ is not recognized.

run below commands by correcting the path


set ORACLE_HOME=C:\oracle\product\11.1.1\as_1
and then execute the below javascripts
set PATH=%ORACLE_HOME%\bin;%PATH%
set JAVA_HOME=%ORACLE_HOME%\jdk
set PATH=%JAVA_HOME%\bin;%PATH%
set PATH=%ORACLE_HOME%\OPatch;%PATH%


After setting above commands try to run opatch apply command

If the patch got succeed then we will get message like "opatch succeeded"


Regards,
Aditya.

Saturday 22 September 2018

Enabling White List Mode in Oracle Access Manager

OAM: Enable White Listing mode

                       We are going to cover about the commands that can be used to enable White listing of URLs in OAM and enable it on OAM Protected applications. This white listing of URLs helps to avoid re-directions to external sites/URLs that are not registered with OAM.

Environment:
OAM 11.1.2.3BP07
RHEL6/OEL6
Steps:

      Enabling and configuring White-listing  mode is very simple and just requires the
     following acitivites.

Enable OAM White listing Mode
Adding/Removing URLs to/from the list of White listed URLs

1. Enable OAM White listing Mode:
Login to the server that contains installation of OAM component
Browse to the following directory
<Oracle_IDM_Home>/common/bin
Execute the following commands
./wlst.sh
connect('weblogic','password','t3://oamhost:7001'>)
domainRuntime()
oamSetWhiteListMode(oamWhiteListMode="true")
This returns the success message as shown below.


2. Adding/Removing URLs to/from the list of White listed URLs :
Execute the below command to add a URL to the list
oamWhiteListURLConfig(Name="SampleApplication",Value="http://Sample Application ,Operation="Update")  

Execute the below command to remove a URL from the list
oamWhiteListURLConfig(Name="SampleApplication",Value="http://Sample Application ,Operation="Remove")  


Thanks,
Aditya


Thursday 6 September 2018

The process cannot access the flie because it is being used by another process exception from HRESULT:0*80070020

Issue:-At times you may notice that one or more Web sites are not started in IIS 7.0. If you try to manually start the Web site, it may fail with the following error message:

Internet Information Services (IIS) Manager - The process cannot access the file because it is being used by another process.
(Exception from HRESULT: 0x80070020)


Environment:-Windows 2012R2 server

Error Cause:-The error code 0x80070020 translates to ERROR_SHARING_VIOLATION (The process cannot access the file because it is being used by another process.)

This issue may occur if TCP port 80 and/or 443 is grabbed by a different service.

Solution:-First check to see what is listening on port 80.
                Open a command prompt and enter the following command:

                 netstat -ano | find ":80"

 netstat -aon | find ":443"
  
  In this case process ID 4228 was listening on port 80.
                  To check what this process is open task manager and locate that PID.
  (Note you may need to select View -> Select columns -> PID first).

 1.It turns out a developer installed Apache which was listeningon port 80 and
    causing a conflict.To resolve the conflict change one service to run on a different
    port or uninstall the unnecessary web server.
 2.In Task bar we can select httpd.exe running on  port 80 and end process

Now you can start and stop IIS website.


Thanks,
Aditya.

Tuesday 24 July 2018

Error:-Bind Failed. Host='oiddomain.com' Details: [LDAP: error code 53 - Password Policy Error :9001: cn=orcladmin : Your account is locked. Contact your OID administrator.]

Error:-Bind Failed. Host='oiddomain.com'
Details: [LDAP: error code 53 - Password Policy Error :9001: cn=orcladmin : Your account is locked. Contact your OID administrator.]


Cause:-1.)If we used ldapsearch command with wrong password more than
                  allowed times
              2.)When accessing odsm console with orcladmin user with wrong password
                  more than allowed times
Solution:-

1.) export ORACLE_INSTANCE=/u01/Oracle_IDM1/asinst_1

     ./oidpasswd connect=OIDDB unlock_su_acct=true

      OID DB user password:

      [gsdsiConnect] Error Creating OCI Environment :-1

      ERROR * gsldpuUnlockSuAccount * ORA-0:▒▒▒▒ encountered

      OID super user account unlocked successfully.

      OIDDB is the TNS Connect string for your Repository database

      Login to the OID database via sqlplus as an user with DBA privileges
     (example. SYS or SYSTEM) and reset the ODS schema password:

     Connect to OIDDB database as SYS user and change ODS account password

     sqlplus

     SQL*Plus: Release 12.2.0.1.0 Production on Fri Jun 22 12:48:09 2018

    Copyright (c) 1982, 2016, Oracle.  All rights reserved.

    Enter user-name: sys as sysdba

    Enter password:XXXXX

   Connected to:

   Oracle Database 12c Enterprise Edition Release 12.2.0.1.0 - 64bit Production

  SQL> alter user ods identified by xxxxx;

  User altered.

  SQL> exit

  Disconnected from Oracle Database 12c Enterprise Edition Release 12.2.0.1.0 - 64bit Production

2.) Now we know  ODS password.Try to unlock the orcladmin account

    export ORACLE_INSTANCE=/u01/Oracle_IDM1/asinst_1

   ./oidpasswd connect=OIDDB reset_su_password=true

    Could not initialize oidldapd Server. Result code = %ld

    export ORACLE_HOME=/u01/Oracle_IDM1
   ./oidpasswd connect=OIDDB reset_su_password=true
   OID DB user password:XXXXX
   new password:XXXXX
   confirm password:XXXXX
   password set

3.)./oidpasswd connect=OIDDB unlock_su_acct=true
    OID DB user password:
    OID super user account unlocked successfully.

   You know the orcladmin password now !!!
   Start OID processes..
   cd /u01/Oracle_IDM1/asinst_1/bin
   opmnctl: starting opmn managed processes…

 Now, you can try to access odsm console and  rerun commands which 
 requires orcladmin  account  passwords


Thanks,
Aditya.

Sunday 1 July 2018

Cloned Oracle Linux (OEL) is missing eth0

Issue:-In my case i faced problem with oracle linux 6.5 cloned server is 
            that it would not have the eth0 network interface
            (no IP address from the DHCP).

Note:-I use a DHCP to assign the IP addresses to these cloned servers.

Troubleshooting:-

I had a problem with the eth0 network interface missing with the cloned server.
ifconfig – When I ran the ifconfig command, I did not see the DHCP assigned IP address.
When we ran the command ip link show, I did not see the network interface eth0.
I tried running network restart command i received below error
Bringing up interface eth0:  Device eth0 does not seem to be present, delaying initialization.

Solution:-

1.) Login as root
2.) Run the command to remove this file: 
      rm –f /etc/udev/rules.d/70-persistent-net.rules
3.) Edit the file ifcfg-eth0
      run following command: vim /etc/sysconfig/network-scripts/ifcfg-eth0
4.) Remove two line from this file. The line that starts with UUID, and the line
      that starts with HWADDR.

5.) Once above two lines are removed them save and quit (wq!)
6.) Run following below command
      ip link set eth1 name eth0
7.) Run following command ip link show to verify that it was renamed
8.)Reboot your machine and Login as root
9.)Run following command and verify:-ifconfig


Thanks,
Aditya.

Saturday 7 April 2018

Unable to Login to OAM Console after changing the Default System Store

Version:-OAM 11.1.2.3.0

CAUSE

At the time of creating Identity Store. The option of "This is the System Store" option was selected.
It is recommended to keep "Embeded LDAP Server" as default identity store.

SOLUTION

1) Goto location /uo02/Oracle_IDM1/common/bin
    Where Oracle_IDM1 is the Oracle home of the IAM Suite

2) Execute the below mentioned commands
    /u02/Oracle_IDM1/common/bin>wlst.bat  or wlst.sh
    on Unix Systems
    wls:/offline> connect()
    Please enter your username :weblogic
    Please enter your password :
    wls:/OMS/serverConfig> displayUserIdentityStore('UserIdentityStore1')
    wls:/OMSbase_domain/serverConfig>                                                   
    editUserIdentityStore(name="UserIdentityStore1",isPrimary="true"
    ,isSystem="true")

3) Restart all your managed servers.

4) Verify if you are able to login as Weblogic user or not.


Thanks,
Aditya.

Wednesday 4 April 2018

Internal error: Cannot obtain XAConnection weblogic.common.resourcepool.ResourceLimitException


Error:-


[2018-02-22T16:03:42.264+05:30] [oim_server1] [NOTIFICATION] [] [org.eclipse.persistence.session.oim] [tid: OIMQuartzScheduler_Worker-9] [userId: oiminternal] [ecid: 0000M6wj4gxFk3QLUa4Eyc1QZcOi000004, 1:22446] [APP: oim#11.1.2.0.0] Communication failure detected when attempting to perform read query outside of a transaction. Attempting to retry query. Error was: Exception [EclipseLink-4002] (Eclipse Persistence Services - 2.3.1.v20111018-r10243): org.eclipse.persistence.exceptions.DatabaseException [[Internal Exception: java.sql.SQLException: Internal error: Cannot obtain XAConnection weblogic.common.resourcepool.ResourceLimitException: No resources currently available in pool oimOperationsDB to allocate to applications, please increase the size of the pool and retry..at weblogic.common.resourcepool.ResourcePoolImpl.reserveResourceInternal(ResourcePoolImpl.java:604)
        at weblogic.common.resourcepool.ResourcePoolImpl.reserveResource(ResourcePoolImpl.java:353)
        at weblogic.common.resourcepool.ResourcePoolImpl.reserveResource(ResourcePoolImpl.java:340)
        at weblogic.jdbc.common.internal.ConnectionPool.reserve(ConnectionPool.java:469)
        at weblogic.jdbc.common.internal.ConnectionPool.reserve(ConnectionPool.java:363)
        at weblogic.jdbc.common.internal.ConnectionPoolManager.reserve(ConnectionPoolManager.java:125)
        at weblogic.jdbc.common.internal.ConnectionPoolManager.reserve(ConnectionPoolManager.java:77)
        at weblogic.jdbc.jta.DataSource.getXAConnectionFromPool(DataSource.java:1791)
        at weblogic.jdbc.jta.DataSource.refreshXAConnAndEnlist(DataSource.java:1582)
        at weblogic.jdbc.jta.DataSource.getConnectionInternal(DataSource.java:499)
        at weblogic.jdbc.jta.DataSource.getConnection(DataSource.java:483)
        at weblogic.jdbc.common.internal.RmiDataSource.getConnectionInternal(RmiDataSource.java:527)
        at weblogic.jdbc.common.internal.RmiDataSource.getConnection(RmiDataSource.java:513)
        at weblogic.jdbc.common.internal.RmiDataSource.getConnection(RmiDataSource.java:506)
        at org.eclipse.persistence.sessions.JNDIConnector.connect(JNDIConnector.java:123)
        at org.eclipse.persistence.sessions.DatasourceLogin.connectToDatasource(DatasourceLogin.java:162)
        at org.eclipse.persistence.internal.databaseaccess.DatasourceAccessor.connectInternal(DatasourceAccessor.java:330)
        at org.eclipse.persistence.internal.databaseaccess.DatabaseAccessor.connectInternal(DatabaseAccessor.java:293)
        at org.eclipse.persistence.internal.databaseaccess.DatasourceAccessor.reconnect(DatasourceAccessor.java:565)
        at org.eclipse.persistence.internal.databaseaccess.DatabaseAccessor.reconnect(DatabaseAccessor.java:1508)
        at org.eclipse.persistence.internal.databaseaccess.DatasourceAccessor.incrementCallCount(DatasourceAccessor.java:305)
        at org.eclipse.persistence.internal.databaseaccess.DatabaseAccessor.basicExecuteCall(DatabaseAccessor.java:579)
        at org.eclipse.persistence.internal.databaseaccess.DatabaseAccessor.executeCall(DatabaseAccessor.java:535)
        at org.eclipse.persistence.internal.sessions.AbstractSession.basicExecuteCall(AbstractSession.java:1717)
        at org.eclipse.persistence.sessions.server.ServerSession.executeCall(ServerSession.java:566)
        at org.eclipse.persistence.sessions.server.ClientSession.executeCall(ClientSession.java:207)
at org.eclipse.persistence.internal.queries.DatasourceCallQueryMechanism.executeCall(DatasourceCallQueryMechanism.java:207)
        at org.eclipse.persistence.internal.queries.DatasourceCallQueryMechanism.executeCall(DatasourceCallQueryMechanism.java:193)
        at org.eclipse.persistence.internal.queries.DatasourceCallQueryMechanism.executeSelectCall(DatasourceCallQueryMechanism.java:264)
        at org.eclipse.persistence.internal.queries.DatasourceCallQueryMechanism.selectAllRows(DatasourceCallQueryMechanism.java:646)
        at org.eclipse.persistence.internal.queries.ExpressionQueryMechanism.selectAllRowsFromTable(ExpressionQueryMechanism.java:2611)
        at org.eclipse.persistence.internal.queries.ExpressionQueryMechanism.selectAllRows(ExpressionQueryMechanism.java:2570)
        at org.eclipse.persistence.queries.ReadAllQuery.executeObjectLevelReadQuery(ReadAllQuery.java:420)
        at org.eclipse.persistence.queries.ObjectLevelReadQuery.executeDatabaseQuery(ObjectLevelReadQuery.java:1081)
        at org.eclipse.persistence.queries.DatabaseQuery.execute(DatabaseQuery.java:844)
        at org.eclipse.persistence.queries.ObjectLevelReadQuery.execute(ObjectLevelReadQuery.java:1040)
        at org.eclipse.persistence.queries.ReadAllQuery.execute(ReadAllQuery.java:392)
        at org.eclipse.persistence.internal.sessions.AbstractSession.internalExecuteQuery(AbstractSession.java:2831)
        at org.eclipse.persistence.internal.sessions.AbstractSession.executeQuery(AbstractSession.java:1516)
        at org.eclipse.persistence.internal.sessions.AbstractSession.retryQuery(AbstractSession.java:1586)
        at org.eclipse.persistence.sessions.server.ClientSession.retryQuery(ClientSession.java:593)
        at org.eclipse.persistence.internal.sessions.AbstractSession.executeQuery(AbstractSession.java:1552)
        at org.eclipse.persistence.internal.sessions.AbstractSession.executeQuery(AbstractSession.java:1498)
        at org.eclipse.persistence.internal.sessions.AbstractSession.executeQuery(AbstractSession.java:1449)
        at org.eclipse.persistence.internal.sessions.AbstractSession.readAllObjects(AbstractSession.java:3193)
        at oracle.iam.scheduler.impl.util.SchedulerUtil.getLastHistoryOfJob(SchedulerUtil.java:1245)
        at oracle.iam.scheduler.impl.quartz.QuartzJob$TaskExecutionAction.run(QuartzJob.java:188)
        at java.security.AccessController.doPrivileged(Native Method)
        at oracle.security.jps.util.JpsSubject.doAsPrivileged(JpsSubject.java:266)
        at oracle.security.jps.internal.jaas.AccActionExecutor.execute(AccActionExecutor.java:65)
        at oracle.security.jps.internal.jaas.AbstractSubjectSecurity$ActionExecutorWrapper.execute(AbstractSubjectSecurity.java:228)
        at oracle.security.jps.internal.jaas.CascadeActionExecutor$SubjectPrivilegedAction.run(CascadeActionExecutor.java:68)
        at weblogic.security.acl.internal.AuthenticatedSubject.doAs(AuthenticatedSubject.java:321)
        at weblogic.security.service.SecurityManager.runAs(SecurityManager.java:120)
        at weblogic.security.Security.runAs(Security.java:41)
        at oracle.security.jps.wls.jaas.WlsActionExecutor.execute(WlsActionExecutor.java:47)
        at oracle.security.jps.internal.jaas.CascadeActionExecutor.execute(CascadeActionExecutor.java:50)
        at oracle.security.jps.internal.jaas.AbstractSubjectSecurity$ActionExecutorWrapper.execute(AbstractSubjectSecurity.java:228)
        at Thor.API.Security.LoginHandler.AssertionLoginSession.runAs(AssertionLoginSession.java:93)
        at oracle.iam.scheduler.impl.quartz.QuartzJob.execute(QuartzJob.java:85)
        at org.quartz.core.JobRunShell.run(JobRunShell.java:202)
        at org.quartz.simpl.SimpleThreadPool$WorkerThread.run(SimpleThreadPool.java:529)

Cause:-

DB is down and listener is not up and running.


Solution:-

1. Open new terminal and check with lsnrctl status
2. Check DB connectivity through sqldeveloper
3. Contact DB team and ensure that DB and listener are up and running.


Thanks,
Aditya.


Sunday 1 April 2018

UnicastUdpSocket failed to set receive buffer size to 1444 packets

Error:-


<Mar 15, 2018 1:16:29 PM IST> <Warning> <Coherence> <BEA-000000> <2018-03-15 13:16:29.502/406.395 Oracle Coherence GE 3.7.1.13 <Warning> (thread=[ACTIVE] ExecuteThread: '0' for queue: 'weblogic.kernel.Default (self-tuning)', member=n/a): PreferredUnicastUdpSocket failed to set receive buffer size to 1444 packets (1.99MB); actual size is 25%, 361 packets (511KB). Consult your OS documentation regarding increasing the maximum socket buffer size. Proceeding with the actual value may cause sub-optimal performance.>


<Mar 15, 2018 1:16:59 PM IST> <Warning> <Coherence> <BEA-000000> <2018-03-15 13:16:59.697/436.590 Oracle Coherence GE 3.7.1.13 <Warning> (thread=Cluster, member=n/a): This Member(Id=0, Timestamp=2018-03-15 13:16:29.524, Address=10.148.192.126:8088, MachineId=8272, Location=site:,machine:droim04,process:18049, Role=WeblogicServer) has been attempting to join the cluster at address /227.7.7.12:9778 with TTL 4 for 30 seconds without success; this could indicate a mis-configured TTL value, or it may simply be the result of a busy cluster or active failover.>

<Mar 15, 2018 1:16:59 PM IST> <Warning> <Coherence> <BEA-000000> <2018-03-15 13:16:59.698/436.591 Oracle Coherence GE 3.7.1.13 <Warning> (thread=Cluster, member=n/a): Received a discovery message that indicates an older member announcing:


Resolution:-

Though it is safe to operate with the smaller buffers it is recommended that you configure your OS to allow for larger buffers.

On Linux execute (as root):-

Go to /etc/sysctl/conf fine and change below value

sysctl -w net.core.rmem_max=2096304

sysctl -w net.core.wmem_max=2096304


Regards,
Aditya.


Saturday 10 March 2018

Setting Up Prerequisites for Oracle DB 11.2.0.4 Installation in Oracle Linux 7.2---Part II

In our previous article, we’ve shown you how to In our previous article, we’ve shown you how to Setting Up Prerequisites for Oracle DB 11.2.0.4 Installation in Oracle Linux 7.2---Part I

In this article we will cover installation and configuration of Oracle DB 11.2.0.4 Installation in Oracle Linux 7.2, along with some Oracle post installation instructions.


1.Below is the location of DB present in my testing environment
   /home/oracle/OID/DB
   Inside DB go to database folder and click on ./runinstaller

2. Our Installer has been launched here. 
    For every steps we need to move forward by
    Clicking Next or OK.. I’m going to skip this step as 
    I don’t want security updates.
    Un-check the check box and mark the checkbox that say “Wish to receive
    security updates via My Oracle Support“.
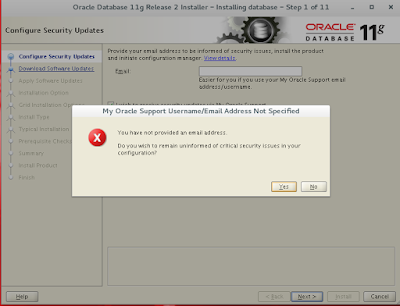
3. Click on Next, you will get a error saying that you’ve not
    provided and email address click Yes to continue
4. While we skipped the email step by default it will choose skip
    software updates Click next to continue
5. Next, choose the type of installation, I’m choosing the first option to
   Create and configure a database.
6. I’m going to choose Server Class here. If we need to install in any
   Desktop machines we can choose the above Option as Desktop Class.


7. We are going to setup only single instance database installation here.
    So, select the first option
8. Choose the Advance install option to get more option while
     going through Installation steps.
9. By Default Language will be chooses as English.
    If you need to change according to your language,
     choose from the below list
10. Time to choose which edition of database installation we looking for.
      For large scale Productions we can use Enterprise 
     or if we need standard edition
     or we can choose the options as mentioned there.
     We need more than 6.5 GB space for Enterprise installation because
     database Population will grow soon/increase.
11. Enter the Oracle base installation location,
      here all installed configurations files will be stored.
     Here you need to define the location of oracle installation path,
     as we created the location in step #12 in the first part of this article.
12. For the first time installation, every Inventory files will be created
      under ‘/u01/app/oralnventory‘ directory.
      We have created the group oracle for installation.
      So now the oracle group has permission to access Inventory Directory.
      Let us choose the Oracle as the Group for Operating system group.
13. Select the type of database, you want to create.
       Since, we are using for General purpose, so choosing general from
       the below options and click Next.
14. Specify the Global Database name for uniquely identified and
     un-check the Create as Container database,
     as here we are not going to create multiple databases.

 15. In my installation, I have assigned 4GB of Memory to my virtual machine,
      but this is not enough for Oracle. Here we need to Enable allocate memory
      automatically for the use of system global Area.
     Check the box that says Enable Automatic Memory Management and
     keep the default allocate memory.
     If we need some sample schema’s we can check and continue for installation.
     In Character set select Use Unicode(AL32UTF8) and click on Next
16. We need to choose the location to store the database storage.
       Here I’m going to assign ‘/u01/app/oracle/oradata‘  location to
       save the databases and Click Next to continue to installer steps.
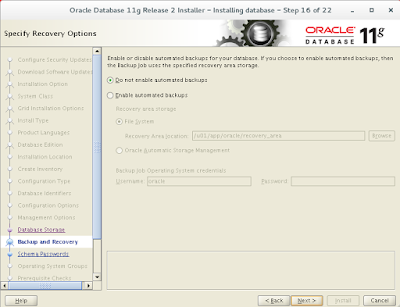
17. If we have to Enable recovery options, then we have to
      check the Enable Recovery.
      In real environment these options are Compulsory to setup.
      Here to enable this option we need to add separate group and we need to
     define one of the file system location rather than default location 
     where our database save.
18. We need to define the password for starter database which
      all pre-loaded while the installations.
      Password must contain alphanumeric, upper_case and lower_case.
19. We need to provide system privileges to create database for that
      we need to choose the oracle group. Choose oracle for every options.
20. At last we can review every settings before database population.
      If we need any changes we can edit the settings.
21. Installation started to Preparation and copying files.
      This will take long time to complete according to our Hardware Resource.
Click on Next
22. During setup process, it will ask to run two scripts as a root
       user as shown in the below picture.

23. That’s it! We’ve successfully completed Database Configuration,
      now click Next to continue installation process.
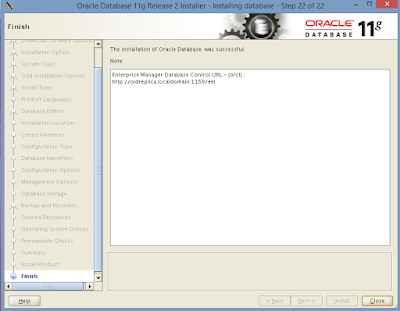
24. Finally Oracle Database installation was successfully completed.
      Click on Close to quit the Oracle Installer
25. After restarting machine, verify that the listener is
      up and running using ‘lsnrctl status‘ command

 26. Next login into Oracle database as a Operating system user using
        sysdba and start-up the database
       In my case already DB is up and running .
27. If listener does not start, you need to replace the domain name
        with local IP address 127.0.0.1 in below file.


That’s it! Finally we’ve successfully completed Setting Up Prerequisites for Oracle DB 11.2.0.4 Installation in Oracle Linux 7.2
If in-case any errors you get while setting up Setting Up Prerequisites for Oracle DB 11.2.0.4 Installation in Oracle Linux 7.2

Feel free to drop your comments.


Regards,
Aditya.