Loading Bulk Organisations Using Bulk Load Utility In OIM 12c (12.2.1.3.0)
The Bulk Load utility is aimed at automating the process of
loading a large amount of data into Oracle Identity Manager. It helps reduce
the downtime involved in loading data. You can use this utility after you
install Oracle Identity Manager or at any time during the production lifetime
of Oracle Identity Manager. The Bulk Load utility can load users, accounts,
roles, role hierarchy, role membership, role category data, and organizations
Modes of Running the Utility
The Bulk Load utility can be run in one of the following
modes:
Offline mode: This is the traditional or existing mode.
To run the utility in offline mode,
Oracle Identity Manager must be
down.
Online mode: In online mode, there is no need to
shut down
Oracle Identity Manager.
online mode only implies that the utility can be run when
Oracle Identity Manager is up and
running.
It is still a command-line utility and no other interface
is available for online mode.
By default, Bulk Load utility runs in online mode.
To choose between the online or offline mode, consider the
following factors:
At times, service availability is more important for
business reasons.
Choose default online mode in this case.
If volume of new entities loaded is not huge, cost of
service restart and index rebuild after offline bulkload is higher than slight
performance degradation in online mode.
Choose default online mode in this case.
When load volume is high and existing system data is less in
comparison, offline bulk load might have some advantages
Prerequisites to run the bulkload utility in OIM12C
Temporary table Space
While running the script, the script will create few
temporary tables.
OIM_BLKLD_TMP_SUFFIX :
The script will first loads data from the CSV file into this table
OIM_BLKLD_EX_SUFFIX :
This table is used to hold data records that fail (are not loaded into Oracle
Identity Manager) during a bulk load operation.
OIM_BLKLD_LOG : The utility inserts progress and error
messages in the OIM_BLKLD_LOG table.
You can use either default OIM table space or separate table
space to store these temporary tables. It is recommended to create and use a
separate tablespace to store these temporary tables. If you want to use the OIM
default table space, add space to this data file. You can add data file to oim
database table space by running the oim_blkld_setup.sql script as explained
below,
Login to OIM database as sysdba
Execute the oim_blkld_setup.sql
Enter the OIM default table space name
Name and full path of the data file to be added in OIM
Database
Enter the OIM database username
Below is the location of oimbulkload in my case:-
1.) /u03/idm/server/db/oim/oracle/Utilities/oimbulkload

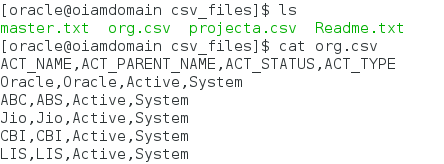
2.) In
/u03/idm/server/db/oim/oracle/Utilities/oimbulkload/csv_files
you should be able to see master.txt file and
Readme.txt files
org.csv file is file which we have
created for loading organisation data
the csv_files directory with the user data to be loaded.
4.) In
master.txt file enter the name of csv file that should be used for
Loading Organisations data and save in our case its org.csv
5.) Stop OIM
server before running Bulk Load Utility
6.) Execute
oim_blkld.sh script.
7.) Select the operation to perform bulkload utility
Here in my case we are loading organisation data
so selected option as 7,select option here as per your requirement
and press enter

8.) Enter Database Details here as per location of db installed
In my case location
is
/u01/app/oracle/product/12.1.0/db_1 as ORACLE_HOME
Press Enter

9.) Once
enter here it shows whether entered ORACLE_HOME is valid or not

//HostIPAddress:Port/ServiceName
//HosIPAddress:1521/orcl and click enter

In my case it is PROD_OIM provide db user name as per your requirement

12.) Once
entered it will as to enter
OIM DB user password twice.Provide
password twice and click on enter


13.) Enter
password for OIM Db user again and click enter

14.) Select
the input for organization load as per your requirement.
In
my case we are loading organisations via
CSV File so chosen option as 2 and enter
15.) Enter
the name of the master file containing names of all
csv files to be loaded.Enter name as master.txt and enter
16.) Enter
the Name of table space to be used for creating custom objects,
by
utility [PROD_OIM],Press enter by default PROD_OIM will be selected.
17.) Enter
the date format for data load: MM-DD-YYYY

18.) Enter batch
size for processing defined size as per your
Requirement and press enter
19.) Do you
wish to insert log messages if yes provide
value as Y and Enter and if no provide value as N and enter

Note:-Fix the issues with failed Organizations and execute
the utility again to load the failed Organizations
22.) Temporary Tables Created
OIM_BLKLD_TMP_{FILE_SUFFIX} : Loads data from csv into this table
OIM_BLKLD_EX_{FILE_SUFFIX}: Stores data records that fail during
bulk
load
OIM_BLKLD_LOG:
Logs errors and monitor progress
23.) Lets login to Identity Console and check the newly
created Organizations.

No comments:
Post a Comment