1.Recommended
minimum RAM needed for Oracle is 2GB or more.
2.Swap must be
enabled double the size of RAM.
3.Disk space
must be more than 8GB, its depends on edition which are
we going to choose for
installing.
4./tmp
directory must have free space more than 1GB for error free installation.
5.Supported
Linux operating systems are RHEL, Centos, Oracle.
6.Both x86_64
and i686 packages are required for installation.
7.Screen
resolution must be more than 1024×768 resolution.
Below is my
Testing Environment
IP Address : 192.168.65.130
Host-name : oidrep.localdomain
Note:-use root login for all below installation instructions
1.)If you’ve not set your system hostname, edit the system hosts file
‘/etc/hosts‘ and enter your hostname entry
along with IP address as shown below.
2. Now change the SELinux mode to
permissive and restart the system to
make Permanent changes for selinux.
Installing Packages and changing Kernel
Values
1.Login as root and install following below
required dependencies.
yum install binutils.x86_64
yum install compat-libcap1.x86_64
yum install compat-libstdc++-33.x86_64
yum install compat-libstdc++-33.i686
yum install compat-gcc-44
yum install compat-gcc-44-c++
yum install gcc.x86_64
yum install gcc-c++.x86_64
yum install glibc.i686
yum install glibc.x86_64
yum install glibc-devel.i686
yum install glibc-devel.x86_64
yum install ksh.x86_64
yum install libgcc.i686
yum install libgcc.x86_64
yum install libstdc++.i686
yum install libstdc++.x86_64
yum install libstdc++-devel.i686
yum install libstdc++-devel.x86_64
yum install libaio.i686
yum install libaio.x86_64
yum install libaio-devel.i686
yum install libaio-devel.x86_64
yum install libXext.i686
yum install libXext.x86_64
yum install libXtst.i686
yum install libXtst.x86_64
yum install libX11.x86_64
yum install libX11.i686
yum install libXau.x86_64
yum install libXau.i686
yum install libxcb.i686
yum install libxcb.x86_64
yum install libXi.i686
yum install libXi.x86_64
yum install make.x86_64
yum install unixODBC
yum install unixODBC-devel
yum install sysstat.x86_64
2.After installing all the above needed
packages, now it’s time to do some
changes at kernel level parameters in
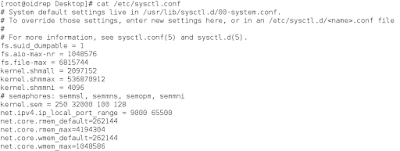
‘/etc/sysct.conf file.
fs.suid_dumpable = 1
fs.aio-max-nr = 1048576
fs.file-max = 6815744
kernel.shmall = 2097152
kernel.shmmax = 536870912
kernel.shmmni = 4096
# semaphores: semmsl, semmns, semopm, semmni
kernel.sem = 250 32000 100 128
net.ipv4.ip_local_port_range = 9000 65500
net.core.rmem_default=262144
net.core.rmem_max=4194304
net.core.wmem_default=262144
net.core.wmem_max=1048586
Save and quit using wq!
3.Once you’ve added above values, now issue
following command to take
new changes into effect.
use command sysctl
-p
4.Restart the machine and following below
for installing Oracle database.
5.Create the new groups Oracle inventory,
OSDBA and OSOPER
for Oracle installation.
groupadd -g 54321 oracle
groupadd -g 54322 dba
groupadd -g 54323 oper
groupadd -g 54324 oinstall
6. Create the new user oracle and add the
user to already created groups.
useradd -u 54324 -g oracle -G dba,oper
oracle
usermod -a -G oinstall oracle
passwd XXXXX
7. If your system is enabled with
firewall, you need to disable or
configure it according to your needs.
To disable it, run the following commands.
service firewalld status
service firewalld stop
service firewalld status
8.Create the following directory for
installing Oracle and change the
ownership and grand permission to the newly
created directory
using recursive.
mkdir -p /u01/app/oracle/product/12.1.0/db_1
chown -R oracle:oinstall /u01
chmod -R 775 /u01
ls -l /u01
9.We need to add the environmental variable
for oracle user.
Open and edit the profile file of oracle
user and append the
oracle environment entries.
Here we don’t need to use sudo command,
as
we are already logged in as root user.
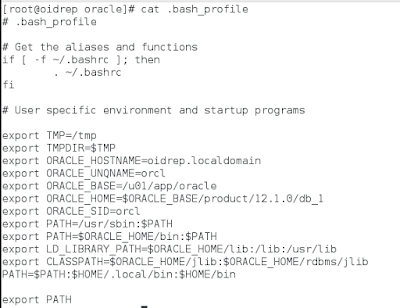
vi /home/oracle/.bash_profile
export TMP=/tmp
export TMPDIR=$TMP
export ORACLE_HOSTNAME=oidrep.localdomain
export ORACLE_UNQNAME=orcl
export ORACLE_BASE=/u01/app/oracle
export
ORACLE_HOME=$ORACLE_BASE/product/12.1.0/db_1
export ORACLE_SID=orcl
export PATH=/usr/sbin:$PATH
export PATH=$ORACLE_HOME/bin:$PATH
export
LD_LIBRARY_PATH=$ORACLE_HOME/lib:/lib:/usr/lib
export
CLASSPATH=$ORACLE_HOME/jlib:$ORACLE_HOME/rdbms/jlib
Save and exit the vi editor using wq!
10.Again, this step is not required, if you
are already using root account,
just switch to oracle user for further
instructions.
11.Here we need to check for the resource
limits for oracle installing user.
Here our Oracle installer user is oracle.
So we must be logged in as oracle user,
while doing resource check.
Check for the soft and hard limits for
file descriptor settings
before installation.
ulimit -Sn
ulimit -Hn
ulimit -Su
ulimit -Hu
ulimit -Ss
ulimit -Hs
11.You may get different values in the above
command.
So, you need to manually assign the
values for limits
in configuration file as shown below.
vi /etc/security/limits.conf
oracle soft nproc
16384
oracle hard nproc
16384
oracle soft nofile
4096
oracle
hard nofile
65536
oracle soft stack
10240
12.Next, edit the below file to set the limit for all users.
# Change this
*
soft nproc 1024
# To this
* - nproc 16384
Save and exit the vi editor using wq!
Read Also: Setting Up Prerequisites for Oracle DB 11.2.0.4 Installation in Oracle Linux 7.2---Part II


No comments:
Post a Comment